A year ago, I was exploring a few Kubernetes CNI plugins when I stumbled upon the Cilium project. Cilium uses eBPF and XDP for network traffic control, security, and visibility.
eBPF (Extended Berkeley Packet Filter) allows you to attach your code on the fly to almost any function within the Linux kernel. XDP (Xpress DataPath), on the other hand, enables manipulation of network traffic even before it reaches the network stack of the Linux kernel. Essentially, eBPF and XDP let you dynamically add logic to network traffic control while bypassing the kernel network stack potentially giving you better performance.
Although I initially considered utilizing these technologies to accelerate Kubernetes workloads using a DPU, a type of smart NIC, eventually I scrapped this XDP offload idea and went in a different direction, but the technology remained stuck in my head since then.
Fast forward to today, I decided to spend a weekend building a functional example that uses most of the basic building blocks of eBPF and XDP.
What the code does?
- User-space configures IP addresses to which the
ping command should be blocked; this configuration can be adjusted on the fly.
- User-space gets notified once ICMP traffic hits the NIC.
How?
- Utilize libbpf to abstract away many of the repeating eBPF boilerplate code, simplifying the process of writing, loading, and managing the eBPF program.
- Establish communication between the user-space code and the eBPF program.
- Utilize an eBPF ring buffer for communication where the XDP will be the initiator.
- Use an eBPF hash map allowing user-space code to dynamically define which IPs should be blocked.
Let’s break down the main parts of the eBPF code.
My personal setup at home includes several machines: a Windows 11 machine and a Linux based home server. Now while Windows 11 is perfect for web browsing and occasional gaming, the bulk of my time is spent writing and compiling code and Windows is not the ideal environment for that. This is where the “Remote SSH” plugin for VSCode comes in handy. It allows you to use your VSCode running on Windows as if It was running on your Linux machine.
Below are the required configuration steps:
- On you Windows machine, generate SSH key pair. Open PowerShell and run the following command:
ssh-keygen -b 4096
By default this will generate two keys under c:/Users/<user name>/.ssh/
Copy the public key [content of id_rsa.pub].
- On your Linux machine, run the following command to create authorized_keys file:
vim ~/.ssh/authorized_keys
Paste the public key from earlier step.
-
Install Remote SSH plugin for VSCode.
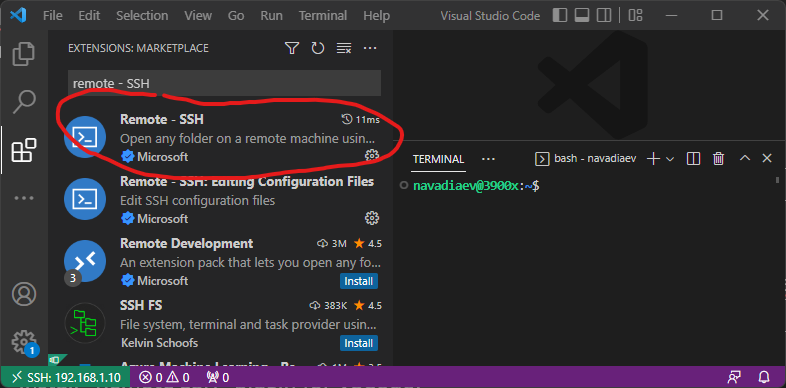
- To configure the plugin, click
ctrl + shift + p and type ssh config. Open the configuration file and fill it with the following [adjusted with your IP addresses and etc]:
Host 192.168.1.10
  HostName 192.168.1.10
  User navadiaev
  Port 22
  PreferredAuthentications publickey
  IdentityFile "C:\Users\nafta\.ssh\id_rsa"
- Click
ctrl + shift + p again and type connect to host.
You should be able to select the host you just configured and login.
Below is a video where I execute the above instructions:
In this short post I am going to explain how to setup an iPXE server with a DHCP proxy, meaning you will not need to configure anything on the existing DHCP server you have on the network. This comes especially handy when you can’t control/modify the existing DHCP server.
Lets dive into the setup instructions. In case you will want to understand a bit more how it all works, I will be uploading a youtube video which explains the configuration provided in this post.
- Install dnsmasq:
sudo apt-get install dnsmasq
-
Get ipxe from https://ipxe.org/download, you can get the source code and compile yourself or just download the precompiled binaries. You can also download all the files needed from link at the end of this post. The file you will need from this step is ipxe.efi, it needs to be placed in the root folder of your tftp server.
-
Download Ubuntu Live 22.04 ISO, from www.ubuntu.com and from the iso image retrieve /casper/initrd and /casper/vmlinuz files. Create folder “casper” at the root folder of your tftp server, and copy both of these files there.
-
You also should create grub/grub.cfg configuration file under your root tftp folder. This file is defines the boot menu you see once your iPXE client boots. Below is an example where we use our iPXE server to boot a Ubuntu ISO image from Ubuntu web servers:
menuentry "Install Ubuntu 22.04 (Pull the iso from web)" {
   set gfxpayload=keep
   linux   /casper/vmlinuz url=https://releases.ubuntu.com/jammy/ubuntu-22.04.1-desktop-amd64.iso only-ubiquity ip=dhcp ---
   initrd  /casper/initrd
}